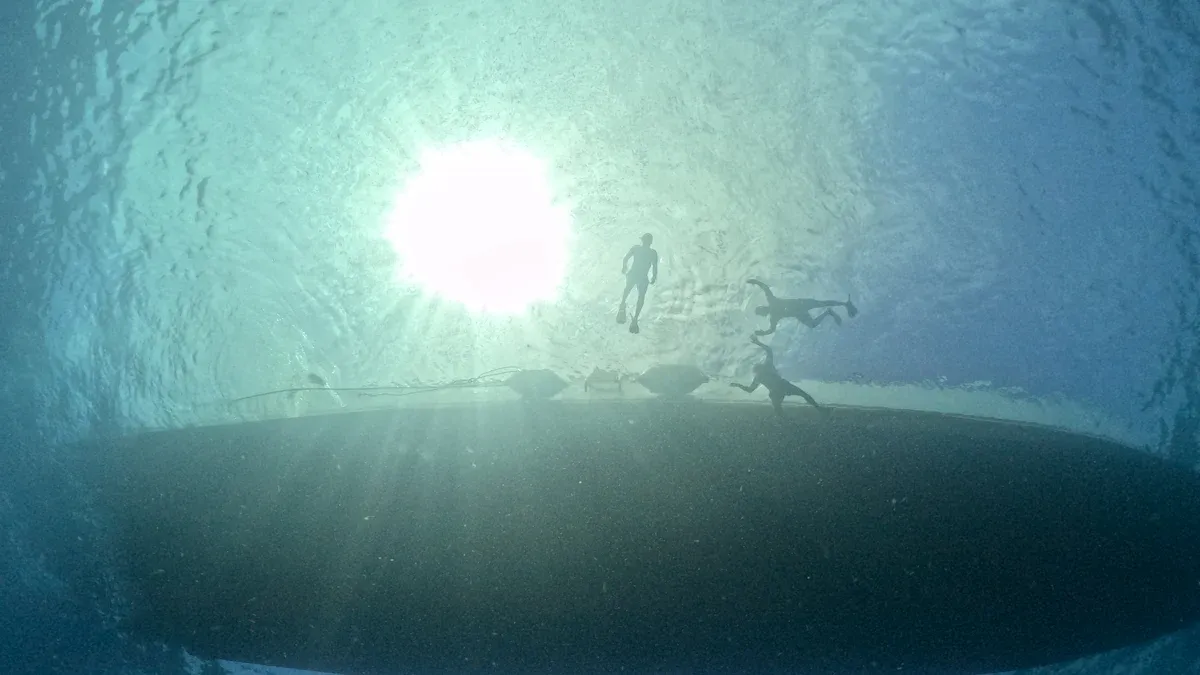
I remember when I first looked into installing LED Fixtures in my pool. The process felt less intimidating than I expected. With a bit of planning and some basic tools, I managed to follow the instructions—just like the Smith family in Florida did with their color-changing setup.
Key Takeaways
- Choosing the right type of waterproof LED pool light depends on your pool type and installation needs; surface-mounted and floating lights are easiest for existing pools, while flush-mounted lights suit new builds.
- Safety is crucial when installing LED fixtures; always turn off power, use waterproof connectors, follow electrical codes, and consider hiring a professional if unsure about handling electricity near water.
- With proper planning, basic tools, and careful steps, many homeowners can install LED pool lights themselves, saving money and enjoying vibrant, energy-efficient lighting.
Factors That Affect Installing LED Fixtures
Types of LED Fixtures for Pools
When I started shopping for pool lights, I realized there are several types of waterproof LED Fixtures. Each type comes with its own installation steps and best uses. Here’s a quick table that helped me compare them:
| Type of Waterproof LED Pool Light | Installation Requirements | Features and Use Case |
|---|---|---|
| Flush-mounted underwater LED lights | Require cutting into pool wall; usually installed during pool construction | Broad underwater illumination; great for safety and style; fit PAR56 niches |
| Surface-mounted underwater LED lights | Attach to pool wall surface; no cutting needed; easy for existing pools | Practical and decorative; no wall modification needed |
| Floating LED pool lights | Float on water; battery-powered; no wiring | Decorative only; easy to install; limited battery life |
| Waterproof LED tea lights | Small, battery-powered, fully submersible | Ambiance lighting; not for full illumination; battery lasts 48-64 hours |
| LED Swimming Pool Lights (PAR56 type) | Installed in PAR56 lamp niches; wired installation | Energy efficient; long lifespan; good for underwater projects |
I found that surface-mounted and floating lights are much easier to install, especially if you already have a finished pool. Flush-mounted lights look sleek but usually need to go in during pool construction.
Tip: Always check the cord length and make sure your new lights match your pool’s existing niche or housing. Some lights only fit certain brands or models.
Pool Setup and Accessibility
The design of your pool changes how easy it is to install LED Fixtures. My friend has an above-ground pool, and he finished his installation in just a few hours. Above-ground pools use surface-mounted or nicheless lights. These attach right to the pool wall, so there’s no need for cutting or drilling. The modular design makes everything simpler.
In-ground pools, like mine, can be trickier. I had to work with the existing structure, which meant dealing with concrete and making sure everything stayed watertight. Sometimes, you need to cut or drill into the pool wall for recessed lights. That’s why many people hire a professional for in-ground pools. The permanent design and materials like concrete or fiberglass add to the complexity.
Surface-mounted lights work for both pool types, but they really shine in above-ground pools because of the easy access. Nicheless lights also make things easier by skipping the bulky housings.
DIY vs. Professional Installation
I weighed the pros and cons before deciding to install the LED Fixtures myself. Here’s a quick comparison that helped me decide:
| Aspect | DIY Installation | Professional Installation |
|---|---|---|
| Labor Cost | Saves labor costs | Labor costs $100 to $300+ |
| Total Project Cost | Lower overall cost (fixture + no labor) | $200 to $900+ including fixture and labor |
| Safety | Electrical risks if not experienced | Ensures safety code compliance |
| Complexity | Needs electrical knowledge | Handled by licensed professionals |
| Additional Services | N/A | Removal of old fixtures, wiring, permits |
| Waterproofing | Must be done carefully | Guaranteed by professional |
| Long-term Benefits | Same energy efficiency and durability | Same energy efficiency and durability |
I saved money by doing it myself, but I had to be extra careful with the wiring and waterproofing. If you’re not comfortable working with electricity near water, hiring a pro is the safer choice. Professionals also handle permits, testing, and make sure everything meets code.
Real-Life Example: Upgrading to LED Fixtures in a Standard In-Ground Pool
Let me walk you through what it looked like when I upgraded my in-ground pool lights. Here’s how the process went:
- I located and removed the screws holding the old pool light. Sometimes, I had to get into the pool to reach them.
- I disconnected the cable from the old light, trying to keep as much wire length as possible.
- I swapped out the old mounting bracket for the new one that came with my LED Fixtures, using the same holes so I didn’t have to drill.
- I stripped the cable to the right length and connected it to the new LED light terminals.
- I tucked the light and wiring back into the pool wall niche and secured it with screws.
- I turned the power back on and watched the new LED Fixtures cycle through their colors.
I did run into a few challenges. Working underwater made things tricky, and I had to double-check every connection to keep it waterproof. Making sure the wiring matched up and the bracket fit right took some patience. If you’re not sure about any step, it’s smart to call a professional. Safety always comes first.
Step-by-Step Guide to Installing Waterproof LED Fixtures

Tools and Materials Needed for LED Fixtures
When I started my pool lighting project, I made a checklist of everything I needed. Having the right tools and materials made the job much smoother. Here’s what I gathered before getting started:
- LED strips or fixtures with an IP67 or IP68 waterproof rating (for underwater use)
- Plastic mounting clips and screws
- PVC strips or clear plastic tubing for mounting and protection
- Waterproof adhesives like silicone glue or epoxy resin
- Low-temperature hot glue (for extra securing)
- Tape measure
- Drill and drill bits
- Screwdrivers (flathead and Phillips)
- Wire strippers
- Weatherproof connectors and heat shrink tubing
- Silicone sealant for waterproofing
- Voltage tester
- Cable ties for organizing wires
- Clean cloth for prepping surfaces
I learned that using mounting clips and waterproof adhesives works better than relying on adhesive tape, which can fail in wet, chemical-heavy environments. I also made sure to clean the pool wall before attaching anything, so the fixtures would stick and stay put.
Tip: Always double-check the IP rating on your LED Fixtures. IP68 means they can handle full submersion, which is a must for pool installations.
Here’s a quick look at how the costs of tools and materials for LED pool lights compare to other options:
| Pool Light Type | Upfront Fixture Cost Range | Lifespan (hours) | Energy Consumption | Additional Installation Costs |
|---|---|---|---|---|
| Incandescent | $450 – $650 | 1,000 – 5,000 | High (100-500W) | Comparable labor and wiring |
| LED | $700 – $1,500 | 20,000 – 30,000 | Low (18-65W, up to 87% less) | May need transformers, waterproof connectors |
| Fiber Optic | $1,300 – $1,700 | N/A | Moderate | Similar or higher |
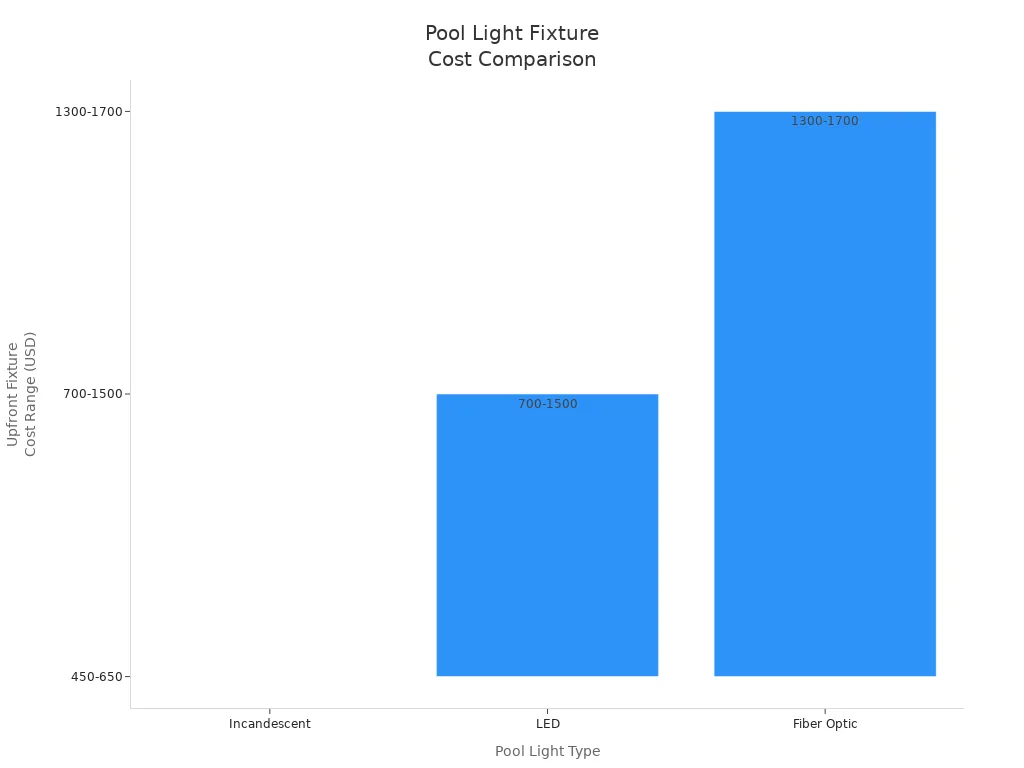
Even though LED Fixtures cost more upfront, I found that their long lifespan and low energy use made them a smart investment.
Safety Precautions When Installing LED Fixtures
Safety always comes first, especially when working with electricity near water. Before I touched anything, I turned off the power at the circuit breaker. I also used a voltage tester to double-check that no current was running to the pool lights.
Manufacturers recommend using only LED Fixtures with an IP68 waterproof rating to prevent leaks and short circuits. I stuck with low-voltage systems (12V or less) to reduce the risk of shock. I made sure all connections were insulated and used waterproof junction boxes above the waterline.
Here are some key safety steps I followed:
- Inspected all fixtures and wires for damage before installation.
- Used only waterproof connectors and sealed every connection with silicone.
- Grounded and bonded the system according to code.
- Installed a GFCI breaker for extra protection.
- Wore gloves and goggles while working.
- Kept the area dry and tidy to avoid slips or accidents.
Note: Electrocution is the biggest risk during pool light installation. I read about a tragic incident involving a child and a faulty pool light, which really drove home the importance of doing things right. If you’re ever unsure, it’s best to call a professional.
Installation Steps for LED Fixtures
I broke down the installation into simple steps. Here’s how I tackled the job:
- Plan the Layout: I mapped out where I wanted each light for the best coverage and effect.
- Turn Off Power: I shut off the pool’s circuit breaker and tested to make sure the power was off.
- Prepare the Surface: I cleaned the pool wall or mounting area thoroughly.
- Mount the Fixtures: I used plastic clips and screws to secure the LED Fixtures, sometimes mounting them on a PVC strip with waterproof epoxy to avoid drilling into the pool wall.
- Route the Wiring: I ran the wires through waterproof conduit or clear tubing, keeping everything neat and protected.
- Make Electrical Connections: I connected the wires using waterproof connectors and sealed them with heat shrink tubing and silicone.
- Test the Lights: Before sealing everything up, I turned the power back on briefly to check that the lights worked.
- Seal and Secure: I applied silicone sealant around all fixtures and tightened screws to ensure a watertight fit.
- Bond and Ground: I connected the system to the pool’s grounding wire for safety.
- Final Inspection: I checked all seals, wires, and connections one last time.
Tip: Always install a GFCI breaker on the circuit. It will cut power instantly if it detects a fault, keeping everyone safe.
Tips for a Smooth LED Fixture Installation
After doing this myself, I picked up a few tricks that made the process easier:
- Clean the area and make sure the ground is level before starting.
- Lay out all your tools and materials so you’re not scrambling mid-project.
- Use a headlamp if you’re working in the evening or in shaded spots.
- Organize wires with cable ties to keep things tidy and safe.
- Double-check the voltage and compatibility of your LED Fixtures before connecting.
- Don’t rush the sealing step—take your time to apply silicone carefully.
- Test each light before finalizing the installation.
- Schedule regular inspections to catch any issues early.
Pro Tip: If you notice flickering or dimming, check the voltage and inspect for water inside the fixture. Fix any leaks right away to prevent bigger problems.
Case Study: DIY LED Fixture Installation in an Above-Ground Pool
My neighbor, Sarah, decided to install LED Fixtures in her above-ground pool last summer. She wanted to save money and tackle the project herself. Here’s how it went for her:
- She spent about a weekend on the project, from planning to final testing.
- She used surface-mounted LED Fixtures with IP68 ratings, which attached easily to the pool wall using mounting clips and waterproof adhesive.
- She ran the wires through clear plastic tubing and used waterproof connectors to keep everything safe.
- Sarah made sure to install a GFCI breaker and checked all connections twice.
- The total cost for her DIY project was much lower than hiring a pro, but she did spend extra time learning about electrical safety and local codes.
| Aspect | DIY Installation | Professional Installation |
|---|---|---|
| Installation Time | 1-2 days (for LED Fixtures only) | 1 day (with a team) |
| Cost | Lower upfront, no labor fees | Higher upfront, includes labor and warranty |
| Skill & Knowledge | Basic DIY skills, some electrical knowledge | Professional expertise, code compliance |
| Warranty & Insurance | Limited or none | Included |
| Permits & Inspections | DIYers must handle themselves | Professionals manage everything |
Sarah’s pool now glows with vibrant colors every night. She felt proud of her work and saved money, but she admitted that the research and prep took more time than she expected. She also said she’d call a pro for any future upgrades involving more complex wiring.
DIY vs. Professional LED Fixture Installation

Pros and Cons of DIY LED Fixture Installation
When I first considered installing LED Fixtures myself, I weighed the pros and cons. Here’s a table that helped me decide:
| Aspect | Advantages of DIY Installation | Disadvantages of DIY Installation |
|---|---|---|
| Cost | Saves money on labor costs | N/A |
| Scheduling | Flexible timing, work at own pace | N/A |
| Expertise | N/A | Requires electrical and pool maintenance knowledge; risk of mistakes and safety hazards |
| Time | N/A | Can be time-consuming, especially for inexperienced individuals |
| Safety Measures | N/A | Proper grounding and GFCI protection are critical but challenging for DIYers |
| Professional Benefits | N/A | Professionals provide expertise, faster installation, and warranty protection |
I liked the idea of saving money and working on my own schedule. Still, I realized that electrical work near water can be risky. Industry experts often recommend professional installation to avoid safety issues.
When to Hire a Professional for LED Fixtures
Sometimes, hiring a pro just makes sense. I look for these signs:
- I feel unsure about mixing water and electricity.
- I don’t know the National Electrical Code.
- I lack hands-on electrical experience.
- I want to avoid costly mistakes that might need fixing later.
- I want the peace of mind that comes with licensed, insured, and trained professionals.
Professionals know how to handle different brands and can work with both filled and empty pools.
Common Challenges and Solutions with LED Fixtures
I ran into a few common problems during installation. Fitting new lights into old niches can be tricky. I solved this by using a threaded reducer adapter, which made the light fit snugly. I also made sure to use the right rubber gaskets and tightened everything to prevent leaks. Sometimes, wiring issues or incompatible transformers caused the lights not to work. I checked all connections, made sure the transformer matched, and cleaned any corroded contacts. Using IP68-rated silicone LED strips helped me avoid waterproofing problems.
Example: Professional LED Fixture Installation for a Custom-Shaped Pool
Last year, I watched a team install LED Fixtures in my friend’s custom-shaped pool. The pros placed lights to highlight steps and curves, used nicheless lights for tight spots, and balanced brightness to avoid glare. They even set up smart controls for color changes and scheduling. The result? The pool looked stunning, felt safer, and the property value went up. The installation cost more than a standard pool, but the tailored lighting design made all the difference.
I found that most homeowners can handle installing pool lights with some planning and clear instructions. Safety always comes first. Careful steps make the job easier. If your pool has a unique shape or you want extra peace of mind, hiring a pro—like the Johnsons did—makes sense.
FAQ
How long did it take me to install LED fixtures in my pool?
I finished the job in one weekend. Planning helped me work faster. I spent most of my time double-checking safety steps.
Do I need special tools for waterproof LED installation?
I used basic tools like screwdrivers, a drill, and silicone sealant. I checked the instructions for any extra items before starting.
Yes! My LED fixtures came with a remote. I switch colors anytime I want. It feels like magic every night.
Post time: Aug-21-2025